ubuntuのsshdを鍵認証にしてLinuxとwindowsからログインできるようにする。

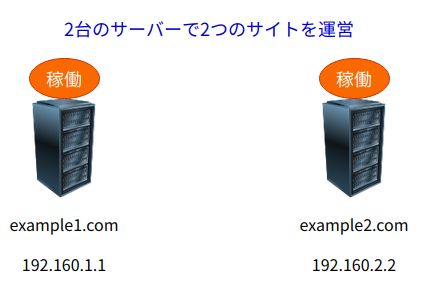
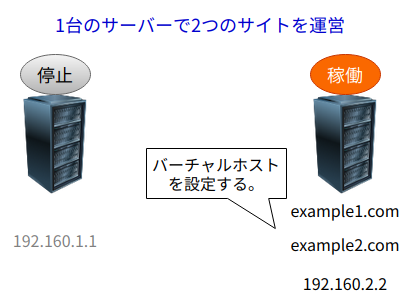
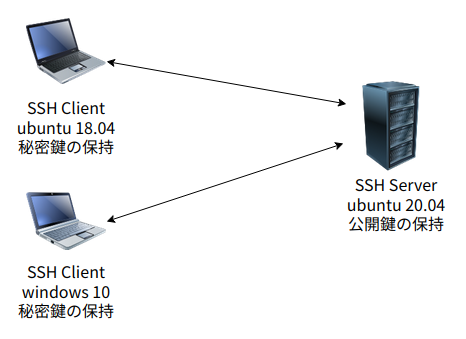
ubuntu20.04にsshdをインストールして認証方式を鍵認証にします。Linux(ubuntu18.04)、windows10のそれぞれからログインできるようにします。このような構成です。

sshdのインストールと起動(ubuntu20.04)

ubuntu20.04にはSSH Serverとなるsshdがインストールされていないので、まずはこれをインストールします。作業はrootユーザーで行います。

sshdのパッケージの検索
# apt search sshd

いくつか結果が表示されますが以下のものをインストールします。

 :
openssh-server/focal-updates,focal-security 1:8.2p1-4ubuntu0.2 amd64
 secure shell (SSH) server, for secure access from remote machines
 :

sshdのインストール
# apt install openssh-server

インストールが終わったらsshdを起動します。いったん設定はデフォルトのままです。

sshdの起動
# systemctl start sshd

今回の場合、SSH ServerのIPアドレスは 192.168.0.5 です。クライアントがSSH Serverのログインに使用するユーザーは tak となります。takのホームディレクトリ配下に .ssh ディレクトリがあることを確認しておいてください。ない場合は作成します。.sshディレクトリの作成はtakユーザーで行います。後ほど、このディレクトリに公開鍵を配置します。

.sshディレクトリの作成
$ mkdir .ssh
$ chmod 700 .ssh

ubuntu18.04、および、windows10からパスワード認証でログインできることを確認します。

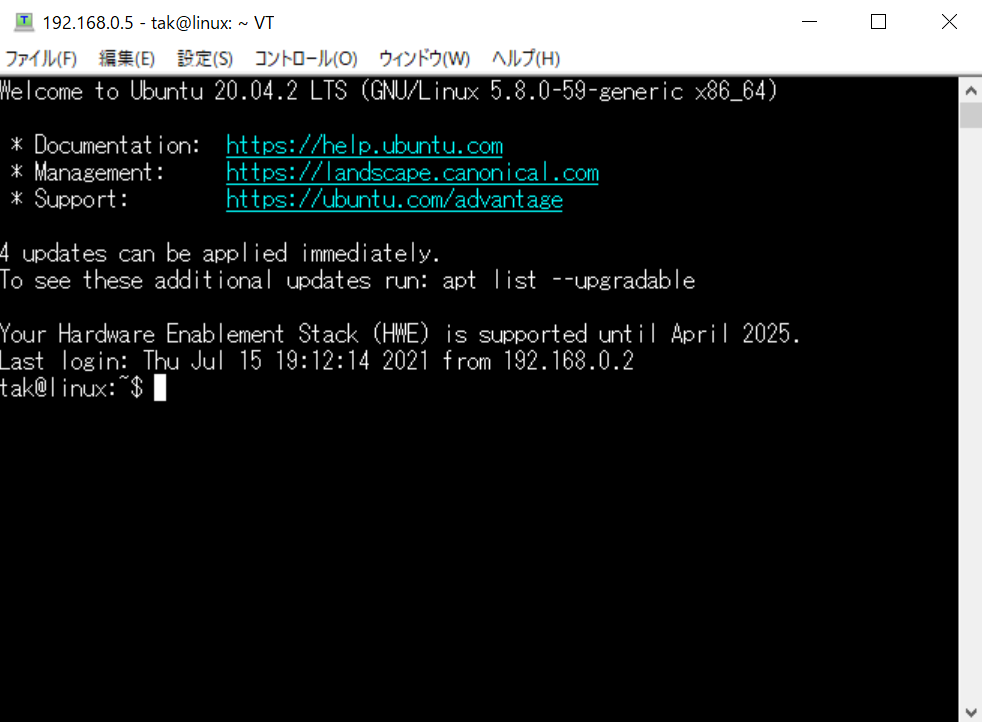
sshコマンドでログイン(ubuntu18.04)
$ ssh tak@192.168.0.5

TeraTermのログイン画面(windows10)

鍵の作成(ubuntu18.04)

ssh-keygenコマンドを使用してクライアント側で秘密鍵と公開鍵を作成します。作成は任意のユーザです。鍵の形式はRSA、ビット長は4096としました。

鍵の生成
$ ssh-keygen -t rsa -b 4096


$ ssh-keygen -t rsa -b 4096
Generating public/private rsa key pair.
Enter file in which to save the key (/home/usr/.ssh/id_rsa): 
Enter passphrase (empty for no passphrase):  ←★パスフレーズの入力(任意)
Enter same passphrase again: 
Your identification has been saved in /home/usr/.ssh/id_rsa.
Your public key has been saved in /home/usr/.ssh/id_rsa.pub.
The key fingerprint is:
SHA256:bq+gdaaFKoUibFxLBMxBzJDnifRgv0X23aNVVQWFhU4 usr@ubuntu18.04
The key's randomart image is:
+---[RSA 4096]----+
 :
 :
+----[SHA256]-----+

途中でパスフレーズの入力を求められますので任意で設定してください。入力なしでも構いません。ユーザーのホームディレクトリ配下の .ssh ディレクトリに秘密鍵と公開鍵が作成されます。デフォルトでは以下の名前になります。

・id_rsa(秘密鍵)
・id_rsa.pub(公開鍵)

このうち公開鍵の方をサーバー(ubuntu20.04)にアップロードします。アップロードにはscpコマンドを使用します。

公開鍵のアップロード
$ cd
$ scp .ssh/id_rsa.pub tak@192.168.0.5:~/.ssh/

アップロード先はtakユーザーのホームディレクトリ配下の.sshディレクトリです。~/.ssh は /home/tak/.ssh のことです。
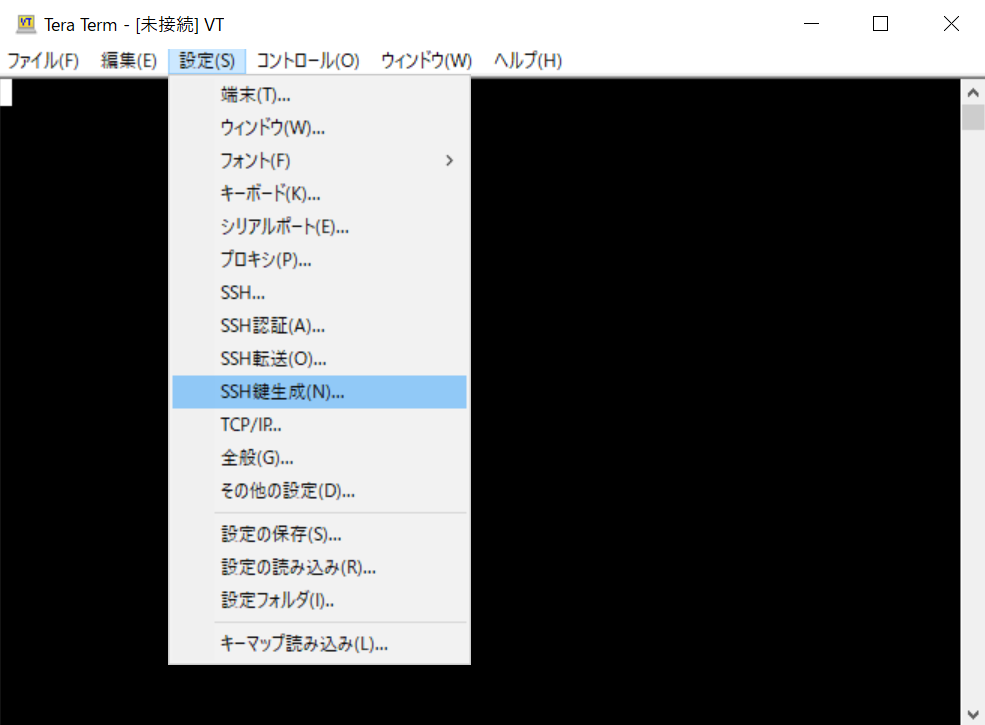
鍵の作成(windows10)

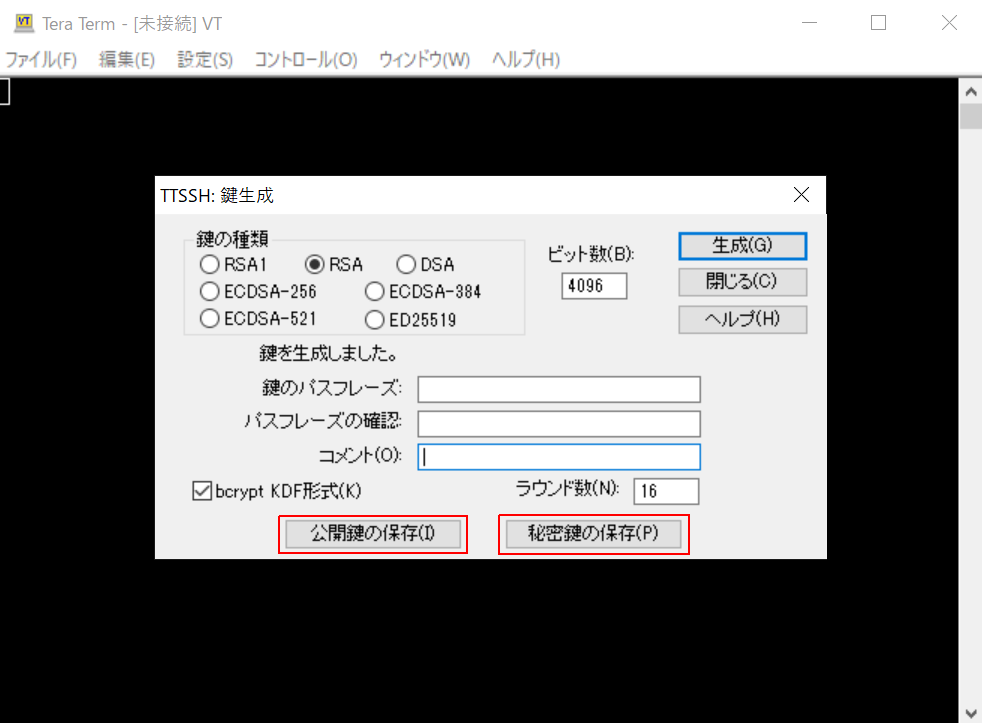
windowsではTeraTermを使って鍵を作成します。設定から「SSH鍵生成」を選択します。

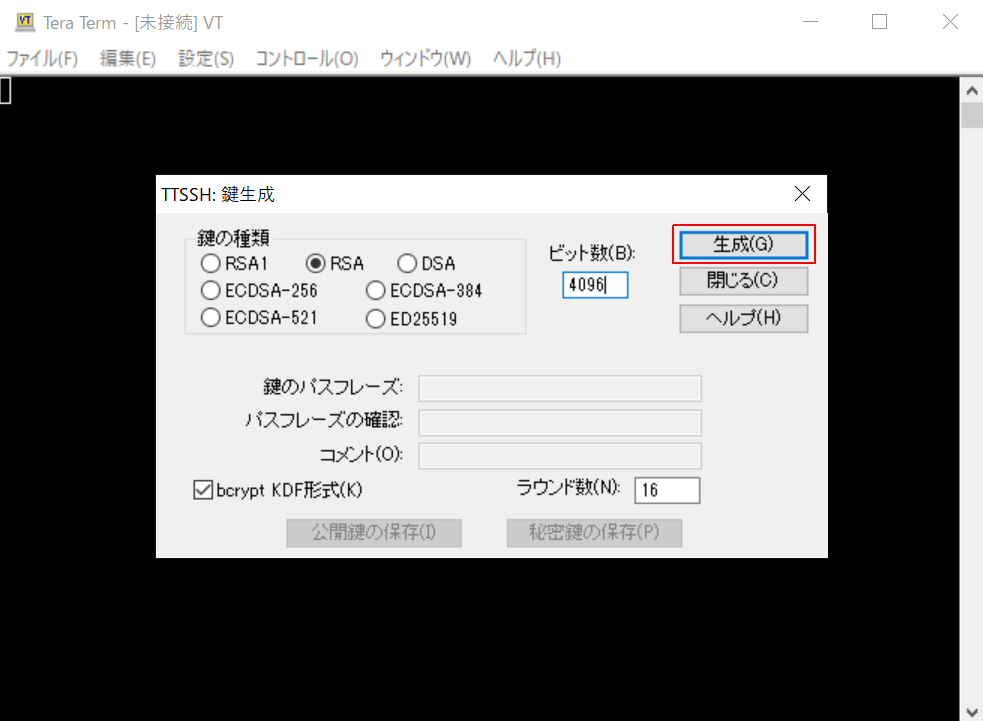
鍵生成の画面が表示されるので、鍵の種類はRSA、ビット数に4096を入力し「生成」ボタンを押下します。

鍵のパスフレーズを入力します。未入力でも構いません。「公開鍵の保存」および「秘密鍵の保存」ボタンを押下し、それぞれの鍵を保存します。秘密鍵の保存の際にパスフレーズが未入力だった場合は「空のパスフレーズを使用しますか?」と聞かれるのですが、「はい」を選択すれば生成されます。鍵の保存先は任意の場所で良いです。

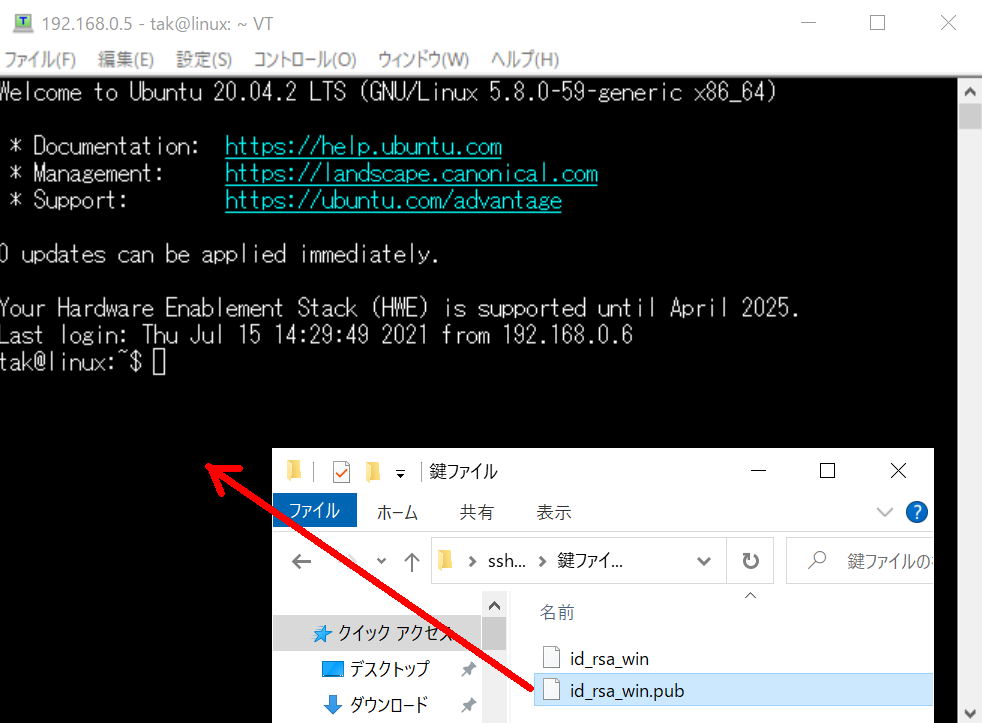
保存した公開鍵をサーバー(ubuntu20.04)にアップロードします。まずパスワード認証でubuntu20.04にログインします。保存した鍵ファイルをTeraTermの画面にドラッグ&ドロップします。

ファイル転送の画面が表示されるので送信先を指定します。送信先ディレクトリはtakユーザーのホームディレクトリ配下の.sshディレクトリです。

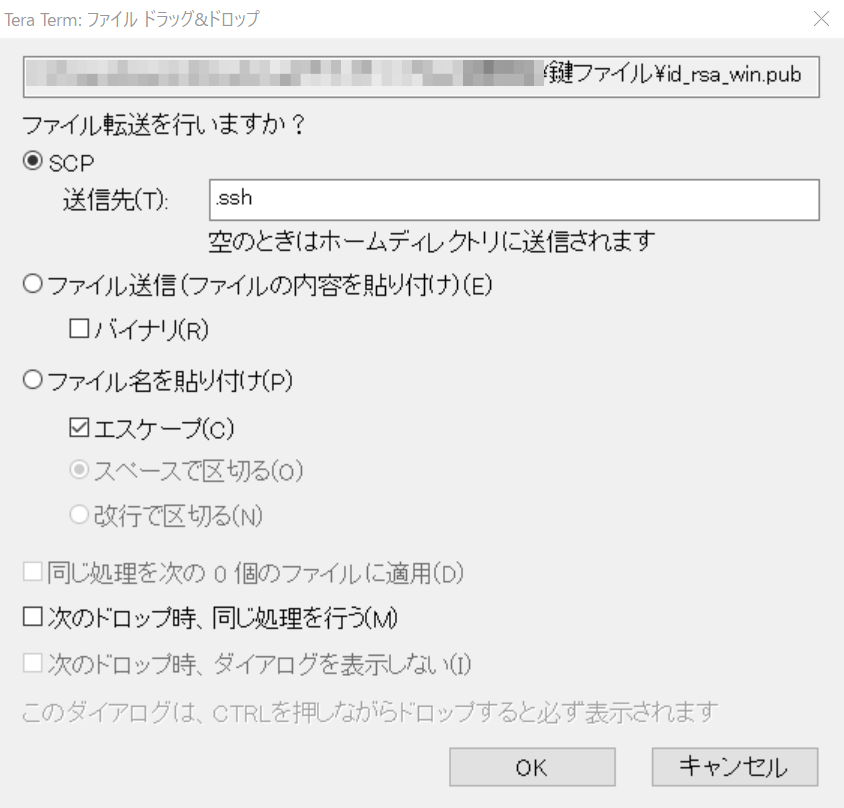
「OK」ボタンを押下してファイルをアップロードします。

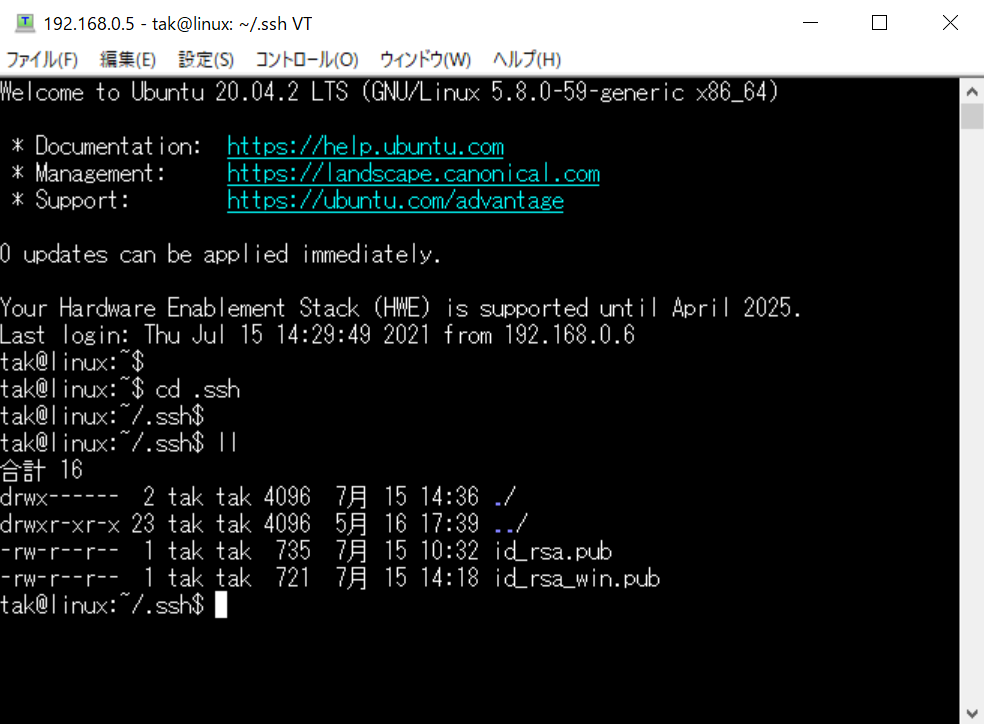
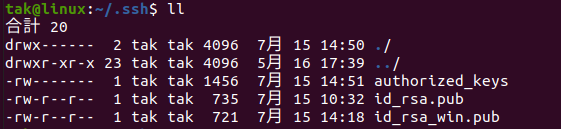
id_rsa.pubがscpでアップロードしたubuntu18.04の公開鍵、id_rsa_win.pubがwindows10の公開鍵です。

鍵認証方式への変更(ubuntu20.04)

takユーザーで鍵認証用のファイル「authorized_keys」を作成します。これは公開鍵をマージしたものです。

鍵認証ファイルの作成
$ cd .ssh
$ touch authorized_keys
$ chmod 600 authorized_keys
$ cat id_rsa.pub >> authorized_keys
$ cat id_rsa_win.pub >> authorized_keys

このような感じです。

authorized_keysが出来たら、id_rsa.pubとid_rsa_win.pubは不要なので削除します。

公開鍵ファイルの削除
$ rm id_rsa.pub
$ rm id_rsa_win.pub

次に、sshdの設定をパスワード認証から鍵認証に変更します。これはrootユーザーで作業します。

sshd_configの編集
# cd /etc/ssh
# vi sshd_config

viでの編集内容は、PasswordAuthenticationのコメントアウトを外してnoに変更します)。

編集前
#PasswordAuthentication yes
 ↓↓↓
編集後
PasswordAuthentication no

sshdを再起動します。

sshdの再起動
# systemctl restart sshd

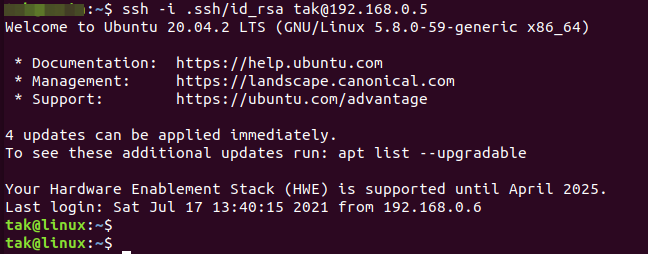
鍵認証でログイン(ubuntu18.04)

sshコマンドの「-i」オプションで秘密鍵を指定してログインします。

鍵認証でログイン
$ ssh -i .ssh/id_rsa tak@192.168.0.5

なお、鍵の指定をしないでログインしようとすると「Permission denied (publickey).」となります。

$ ssh tak@192.168.0.5
tak@192.168.0.5: Permission denied (publickey).
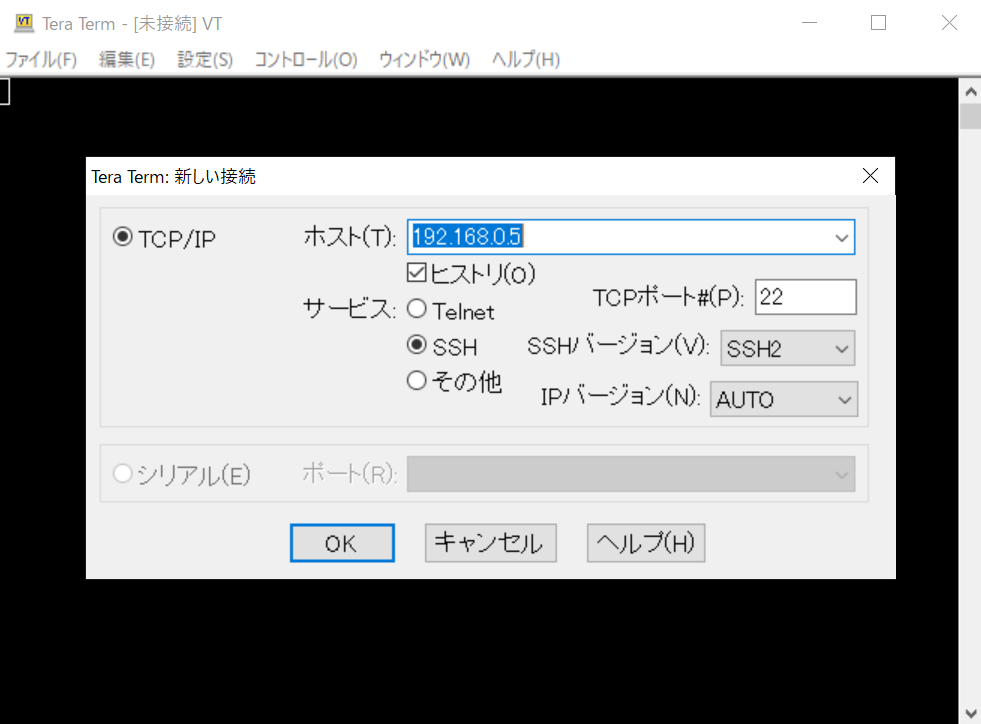
鍵認証でログイン(windows10)

TeraTermでログインをします。ホストにIPアドレス、サービスにSSH、ポートに22を設定して接続すると、認証の画面が表示されます。ユーザー名とパスフレーズ(設定した場合のみ)を入力し、認証方式は「RSA/DSA/ECDSA/ED25529鍵を使う」にチェックをします。

秘密鍵の指定には保存した秘密鍵を指定します。今回はwindowsの秘密鍵の名前を「id_rsa_win」としたのですが、この名前だと秘密鍵と認識しないようですので名称を「id_rsa」に変更してください。

「OK」ボタンを押下するとログインできます。

Let’s Encryptのサーバー証明書の移行方法

サイトを別サーバーに移行する際、サーバー証明書の移行が必要になります。その移行の手順について書いてみます。

example1.comというドメインのサイトを別サーバーに移行するのですが、移行先のサーバーではすでにexample2.comというドメインのサイトを運営中で、1台のWEBサーバーに運営サイトを集約します。移行先のWEBサーバーではApacheが稼働していてバーチャルホストの設定を行います。

移行前はこのような構成です。

これをこんな感じの構成にします。

移行手順をまとめると、以下のようになります。

  1. 移行先のサーバーでバーチャルホストの設定をする。
  2. サイトを移行する。
  3. サーバー証明書を一時的に移行する。
  4. DNSの設定を変える。
  5. 移行先のサーバーでサーバー証明書の再取得をする。
  6. サーバー証明書の更新をする。

バーチャルホストの設定とサイトの移行は出来ているものとします。

サーバー証明書を一時的に移行する。

移行元サーバーでサーバー証明書の確認をします。

Let’s Encryptのサーバー証明書は /etc/letsencrypt/live/(ドメイン名)にあります。ただこのディレクトリのファイルはシンボリックリンクになっており実体のファイルは別の場所になります。実体のファイルがどこにあるかというと /etc/letsencrypt/archive/(ドメイン名)です。複数のファイルで構成されており証明書を何度か更新していると連番がつきます。live および archiveディレクトリはroot権限がないと入れませんのでrootユーザーで作業してください。

cert.pem ・・ サーバー証明書ファイル
chain.pem ・・ 中間CA証明書ファイル
fullchain.pem・・ サーバー証明書ファイル
privkey.pem ・・ 秘密鍵ファイル

fullchain.pem は cert.pem と chain.pem をマージしたものです。Apacheではこれらのファイルすべてを使うわけではなくApacheのバージョンによって使うファイルが異なります。

Apache2.4.7以前では3つのファイルを使います。
・cert.pem
・chain.pem
・privkey.pem

Apache2.4.8以降では2つのファイルを使います。
・fullchain.pem
・privkey.pem

archive配下にある最新のサーバー証明書を移行します。最新のファイルは /etc/letsencrypt/live のシンボリックリンクがされているファイルです。今回は移行先のApacheが2.4.6なので cert.pem、chain.pem、privkey.pem を持っていきます。

ここから移行先サーバーでの作業です。

サーバー証明書を配置するディレクトリを作成します。サーバー証明書が漏洩しないようにroot権限でないとアクセスできない場所にしましょう。今回は /etc/letsencrypt/live 配下にしました。live配下にドメイン名とは異なるディレクトリを作成してサーバー証明書を配置します(ドメイン名とは異なるディレクトリ名にする理由は後述します)。本来はlive配下はシンボリックリンクにするべきでしょうが実体のファイルを直に置いてしまいます。サーバー証明書に連番がついていた場合は連番を取り除いて(リネームして)配置します。

作成するディレクトリ
/etc/letsencrypt/live/dummy.com

配置するファイル
・cert.pem
・chain.pem
・privkey.pem

バーチャルホストにSSL設定を追記します。このような感じです。


SSLCertificateFile /etc/letsencrypt/live/dummy.com/cert.pem
SSLCertificateKeyFile /etc/letsencrypt/live/dummy.com/privkey.pem
SSLCertificateChainFile /etc/letsencrypt/live/dummy.com/chain.pem

記載が出来たらApacheを再起動して設定を反映させます。

# systemctl restart httpd

ただこのままだとユーザーのサイトへのアクセスは移行元サーバーになっているためDNSの設定を変更して移行先のサーバーに向くようにします。DNSのAレコードを移行先サーバーのIPアドレスに変更するだけで良く、ドメインの移管は不要です。この手順はドメインを取得した会社で操作手順(ゾーン編集の管理画面)が用意されていると思いますので、ここでは割愛します。

これでサーバー証明書の移行は完了です。httpsでサイトにアクセスすればブラウザのアドレスバーに鍵マークが表示されると思います。

いったんはこれで移行したサイトの安定稼働を確認しましょう。

なお、ここで移行した証明書は一時的なものです。サーバー証明書の更新は出来ないと思われるため改めて証明書の再取得を行います。

移行先のサーバーでサーバー証明書の再取得をする。

移行先サーバーでは別のドメイン(example2.com)がSSLで稼働しており、またcertbotはインストール済みとします。

サーバー証明書を再取得する前に移行元サーバーで使っていた証明書を失効させる必要があるか?が気になるところですが、証明書を失効させる必要はありません。サーバー証明書の秘密鍵が漏洩でもしない限り、そのままにしておいても良いでしょう。

サーバー証明書を再取得するにはrootユーザーで以下のコマンドを実行します。


# certbot certonly --webroot -w /var/www/html/example1 -d example1.com -d www.example1.com

コマンドの説明をしておくと、-w オプションで指定する /var/www/html/example1 はドキュメントルートです。また -d オプションですが証明書を取得するドメイン名を指定します。上記の例だと example1.com および www.example1.com の2つに対して証明書を取得するようにしています。

ただこのコマンドをバーチャルホストを設定したまま実行したら失敗しました。--dry-run オプションを付けて実行した時のログです。IPアドレスは伏せさせていただきました。


# certbot certonly --webroot -w /var/www/html/example1 -d example1.com -d www.example1.com --dry-run
Saving debug log to /var/log/letsencrypt/letsencrypt.log
Plugins selected: Authenticator webroot, Installer None
Starting new HTTPS connection (1): acme-staging-v02.api.letsencrypt.org
Simulating a certificate request for example1.com and www.example1.com
Performing the following challenges:
http-01 challenge for example1.com
http-01 challenge for www.example1.com
Using the webroot path /var/www/html/example for all unmatched domains.
Waiting for verification...
Challenge failed for domain example1.com
Challenge failed for domain www.example1.com
http-01 challenge for example1.com
http-01 challenge for www.example1.com
Cleaning up challenges
Some challenges have failed.

IMPORTANT NOTES:
 - The following errors were reported by the server:

   Domain: example1.com
   Type:   unauthorized
   Detail: Invalid response from
   http://example1.com/.well-known/acme-challenge/JV-O1y2bfSzQ7sODnO8NMJx8nIRTluM-M0VUo3FJSjE
   [xxx.xxx.xxx.xxx]: "<!DOCTYPE HTML PUBLIC \"-//IETF//DTD HTML
   2.0//EN\">\n<html><head>\n<title>404 Not
   Found</title>\n</head><body>\n<h1>Not Found</h1>\n<p"

   Domain: www.example1.com
   Type:   unauthorized
   Detail: Invalid response from
   https://www.example1.com/.well-known/acme-challenge/4Jfu0yAM2LR7VO8fDtajGRzgtk2WxWWanNeq96cqHpg
   [xxx.xxx.xxx.xxx]: "<!DOCTYPE HTML PUBLIC \"-//IETF//DTD HTML
   2.0//EN\">\n<html><head>\n<title>404 Not
   Found</title>\n</head><body>\n<h1>Not Found</h1>\n<p"

   To fix these errors, please make sure that your domain name was
   entered correctly and the DNS A/AAAA record(s) for that domain
   contain(s) the right IP address.

いろいろ試した結果わかったことですがバーチャルホストにexample2があるとどうもうまくいかない。バーチャルホストの設定からexample2を外します。

バーチャルホストの設定(修正前)
= = = = = = = = = = = = = = = =
[httpd.conf]
<VirtualHost *:80>
  ServerName www.example2.com
  :
</VirtualHost>
<VirtualHost *:80>
  ServerName www.example1.com
  :
</VirtualHost>

[ssl.conf]
<VirtualHost *:443>
  ServerName www.example2.com:443
  :
</VirtualHost>
<VirtualHost *:443>
  ServerName www.example1.com:443
  :
</VirtualHost>
= = = = = = = = = = = = = = = =

バーチャルホストの設定(修正後)
= = = = = = = = = = = = = = = =
[httpd.conf]
<VirtualHost *:80>
  ServerName www.example1.com
  :
</VirtualHost>

[ssl.conf]
<VirtualHost *:443>
  ServerName www.example1.com:443
  :
</VirtualHost>
= = = = = = = = = = = = = = = =

example1を先に持ってくればうまくいくかもしれませんがそれは試してないです。example1だけの設定にして実行したログです。


# certbot certonly --webroot -w /var/www/html/example1 -d example1.com -d www.example1.com
Saving debug log to /var/log/letsencrypt/letsencrypt.log
Plugins selected: Authenticator webroot, Installer None
Starting new HTTPS connection (1): acme-v02.api.letsencrypt.org
Requesting a certificate for example1.com and www.example1.com
Performing the following challenges:
http-01 challenge for example1.com
http-01 challenge for www.example1.com
Using the webroot path /var/www/html/example1 for all unmatched domains.
Waiting for verification...
Cleaning up challenges

IMPORTANT NOTES:
 - Congratulations! Your certificate and chain have been saved at:
   /etc/letsencrypt/live/example1.com/fullchain.pem
   Your key file has been saved at:
   /etc/letsencrypt/live/example1.com/privkey.pem
   Your certificate will expire on 2021-06-13. To obtain a new or
   tweaked version of this certificate in the future, simply run
   certbot again. To non-interactively renew *all* of your
   certificates, run "certbot renew"
 - If you like Certbot, please consider supporting our work by:

   Donating to ISRG / Let's Encrypt:   https://letsencrypt.org/donate
   Donating to EFF:                    https://eff.org/donate-le

実際にサーバー証明書が出来たか確認します。/etc/letsencrypt/live 配下は以下のようになっています。

/etc/letsencrypt/live 配下のディレクトリ
・dummy.com
・example1.com
・example2.com

example1.comディレクトリの配下を見ると4つのサーバー証明書が出来ていました。
・cert.pem
・chain.pem
・fullchain.pem
・privkey.pem

少し話が戻ります。/etc/letsencrypt/live 配下にドメイン名とは異なるディレクトリを作成してサーバー証明書を配置した理由ですが、サーバー証明書を再取得するとドメイン名のディレクトリが出来るので、それと分けるために別の名前にしていました。サーバー証明書が再取得できたのでdummy.com配下の証明書は不要です。削除しておきましょう。

SSL設定もdummy.comからexample1.comになおしておきます。


SSLCertificateFile /etc/letsencrypt/live/example1.com/cert.pem
SSLCertificateKeyFile /etc/letsencrypt/live/example1.com/privkey.pem
SSLCertificateChainFile /etc/letsencrypt/live/example1.com/chain.pem

なお、再取得が出来たらバーチャルホストの設定は戻しておいてください(httpd.conf、ssl.confにexample2を追加する)。

サーバー証明書の更新をする。

Let’s Encryptでは証明書の有効期間が90日なので期限が来る前にサーバー証明書の更新が必要です。サーバー証明書を更新するにはrootユーザーで以下のコマンドを実行します。

# certbot renew

ただこのコマンドもそのまま実行してもうまくいきませんでした。example2 もしくは example1 のどちらかが失敗してしまいます。--dry-run オプションを付けて実行した時のログです。


# certbot renew --dry-run
Saving debug log to /var/log/letsencrypt/letsencrypt.log

- - - - - - - - - - - - - - - - - - - - - - - - - - - - - - - - - - - - - - - -
Processing /etc/letsencrypt/renewal/example2.com.conf
- - - - - - - - - - - - - - - - - - - - - - - - - - - - - - - - - - - - - - - -
Cert not due for renewal, but simulating renewal for dry run
Plugins selected: Authenticator webroot, Installer None
Starting new HTTPS connection (1): acme-staging-v02.api.letsencrypt.org
Simulating renewal of an existing certificate for example2.com and www.example2.com
Performing the following challenges:
http-01 challenge for example2.com
http-01 challenge for www.example2.com
Waiting for verification...
Cleaning up challenges

- - - - - - - - - - - - - - - - - - - - - - - - - - - - - - - - - - - - - - - -
new certificate deployed without reload, fullchain is
/etc/letsencrypt/live/example2.com/fullchain.pem
- - - - - - - - - - - - - - - - - - - - - - - - - - - - - - - - - - - - - - - -

- - - - - - - - - - - - - - - - - - - - - - - - - - - - - - - - - - - - - - - -
Processing /etc/letsencrypt/renewal/example1.com.conf
- - - - - - - - - - - - - - - - - - - - - - - - - - - - - - - - - - - - - - - -
Cert not due for renewal, but simulating renewal for dry run
Plugins selected: Authenticator webroot, Installer None
Starting new HTTPS connection (1): acme-staging-v02.api.letsencrypt.org
Simulating renewal of an existing certificate for example1.com and www.example1.com
Performing the following challenges:
http-01 challenge for example1.com
http-01 challenge for www.example1.com
Waiting for verification...
Challenge failed for domain example1.com
http-01 challenge for example1.com
Cleaning up challenges
Failed to renew certificate example1.com with error: Some challenges have failed.

- - - - - - - - - - - - - - - - - - - - - - - - - - - - - - - - - - - - - - - -
The following simulated renewals succeeded:
  /etc/letsencrypt/live/example2.com/fullchain.pem (success)

The following simulated renewals failed:
  /etc/letsencrypt/live/example1.com/fullchain.pem (failure)
- - - - - - - - - - - - - - - - - - - - - - - - - - - - - - - - - - - - - - - -
1 renew failure(s), 0 parse failure(s)

IMPORTANT NOTES:
 - The following errors were reported by the server:

   Domain: example1.com
   Type:   unauthorized
   Detail: Invalid response from
   http://example1.com/.well-known/acme-challenge/jxPd1NdUyLp-HoKR-SwSD9DDkgwcf4N319xkWscY_T8
   [xxx.xxx.xxx.xxx]: "<!DOCTYPE HTML PUBLIC \"-//IETF//DTD HTML
   2.0//EN\">\n<html><head>\n<title>404 Not
   Found</title>\n</head><body>\n<h1>Not Found</h1>\n<p"

   To fix these errors, please make sure that your domain name was
   entered correctly and the DNS A/AAAA record(s) for that domain
   contain(s) the right IP address.

Let’s Encryptでは外部のサーバーからcertbotがドキュメントルート配下に作成した一時ファイル(.well-known/acme-challengeの配下に作成されるファイル)にアクセスしてサイトの所有者を確認しているのですが、どうもcertbotがバーチャルホストに設定した1つ目のドメインの方に常に一時ファイルを作成しているように思われる。証拠はないのだけれどApacheのアクセスログを確認すると外部のサーバーは正しいドメインにアクセスして来ているからファイルが作成される場所が間違っているとしか思えない。

エラーになる原因は不明ですが、回避するためにexample1とexample2を別々に更新する方法にしました。良い方法とは言えませんが、それを書いておきます。certbotのコマンドで指定したドメインのみを更新するオプションがあればそれを使えそうですが、わかりませんでしたので。

まず、example1とexample2を別々に実行するためにcertbotの設定ファイルを修正(リネーム)します。場所は /etc/letsencrypt/renewal 配下のファイルです。example2だけサーバー証明書を更新する場合です。

修正前
example1.com.conf
example2.com.conf
 ↓
修正後
example1.com.conf.back
example2.com.conf

次に、バーチャルホストの設定も修正します。httpd.conf、ssl.confのバーチャルホストの1つ目にexample2.comを、2つ目にexample1.comを記載します。

= = = = = = = = = = = = = = = =
[httpd.conf]
<VirtualHost *:80>
  ServerName www.example2.com
  :
</VirtualHost>
<VirtualHost *:80>
  ServerName www.example1.com
  :
</VirtualHost>

[ssl.conf]
<VirtualHost *:443>
  ServerName www.example2.com:443
  :
</VirtualHost>
<VirtualHost *:443>
  ServerName www.example1.com:443
  :
</VirtualHost>
= = = = = = = = = = = = = = = =

Apacheで設定ファイルのリロードをします。

# systemctl reload httpd

改めてサーバー証明書の更新をします。以下がその時のログです。--dry-run オプションを付けてます。


# certbot renew --dry-run
Saving debug log to /var/log/letsencrypt/letsencrypt.log

- - - - - - - - - - - - - - - - - - - - - - - - - - - - - - - - - - - - - - - -
Processing /etc/letsencrypt/renewal/example2.com.conf
- - - - - - - - - - - - - - - - - - - - - - - - - - - - - - - - - - - - - - - -
Cert not due for renewal, but simulating renewal for dry run
Plugins selected: Authenticator webroot, Installer None
Starting new HTTPS connection (1): acme-staging-v02.api.letsencrypt.org
Simulating renewal of an existing certificate for example2.com and www.example2.com
Performing the following challenges:
http-01 challenge for example2.com
http-01 challenge for www.example2.com
Waiting for verification...
Cleaning up challenges

- - - - - - - - - - - - - - - - - - - - - - - - - - - - - - - - - - - - - - - -
new certificate deployed without reload, fullchain is
/etc/letsencrypt/live/example2.com/fullchain.pem
- - - - - - - - - - - - - - - - - - - - - - - - - - - - - - - - - - - - - - - -

- - - - - - - - - - - - - - - - - - - - - - - - - - - - - - - - - - - - - - - -
Congratulations, all simulated renewals succeeded: 
  /etc/letsencrypt/live/example2.com/fullchain.pem (success)
- - - - - - - - - - - - - - - - - - - - - - - - - - - - - - - - - - - - - - - -

面倒なのですが、example1のサーバー証明書を更新する場合も同様にcertborの設定ファイルをリネームしてからバーチャルホストの設定を書き換えて実行します。

/etc/letsencrypt/renewal 配下のファイル
example1.com.conf
example2.com.conf.back

バーチャルホストの設定
= = = = = = = = = = = = = = = =
[httpd.conf]
<VirtualHost *:80>
  ServerName www.example1.com
  :
</VirtualHost>
<VirtualHost *:80>
  ServerName www.example2.com
  :
</VirtualHost>

[ssl.conf]
<VirtualHost *:443>
  ServerName www.example1.com:443
  :
</VirtualHost>
<VirtualHost *:443>
  ServerName www.example2.com:443
  :
</VirtualHost>
= = = = = = = = = = = = = = = =

Apacheの設定ファイルのリロード
# systemctl reload httpd

サーバー証明書の更新
# certbot renew

example1.comのサーバー証明書を更新したときのログは省略します。

これで無事、サーバー証明書の移行が完了です。